Releases
What is a release?
A release is a well-defined version of your project that is documented and packaged for deployment (whether production-ready or not). A release comprises a set of assets, a snapshot of the automation used to deploy the assets, and a set of variables to configure the deployment.
A release contains one or more pipeline templates, which define the automation for how a release is deployed to an environment. One pipeline template can be used for all environments, but this is not a requirement. For example, some projects may have different automation steps for deploying to a development environment versus production.
Also, a release is associated with a release lifecycle, which describes how a release is propagated between environments. The release lifecycle can also introduce governance policies to control when a release can be propagated between stages in the lifecycle. Governance policies can include manual approvals or automated gates.
Check the FAQ to see if there's already an answer.
Viewing releases
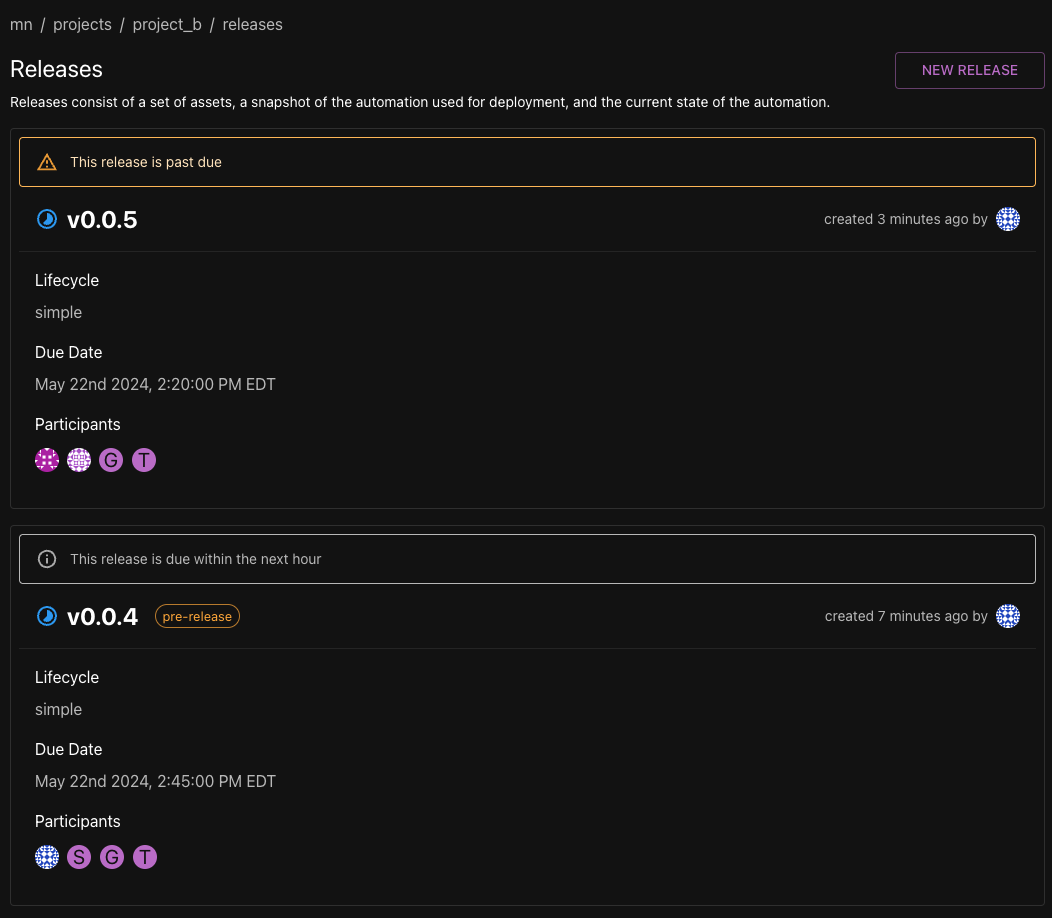
To view releases, select Releases from the project sidebar. This will display a list of all releases within the project.
Each release card item displays a summary of the release details, including the release version, an icon displaying the status of the release, and the date the release was created. A chip notes if the release is a pre-release.

If the release has a due date, a notification banner will display if the due date is approaching or has passed.
Release details page
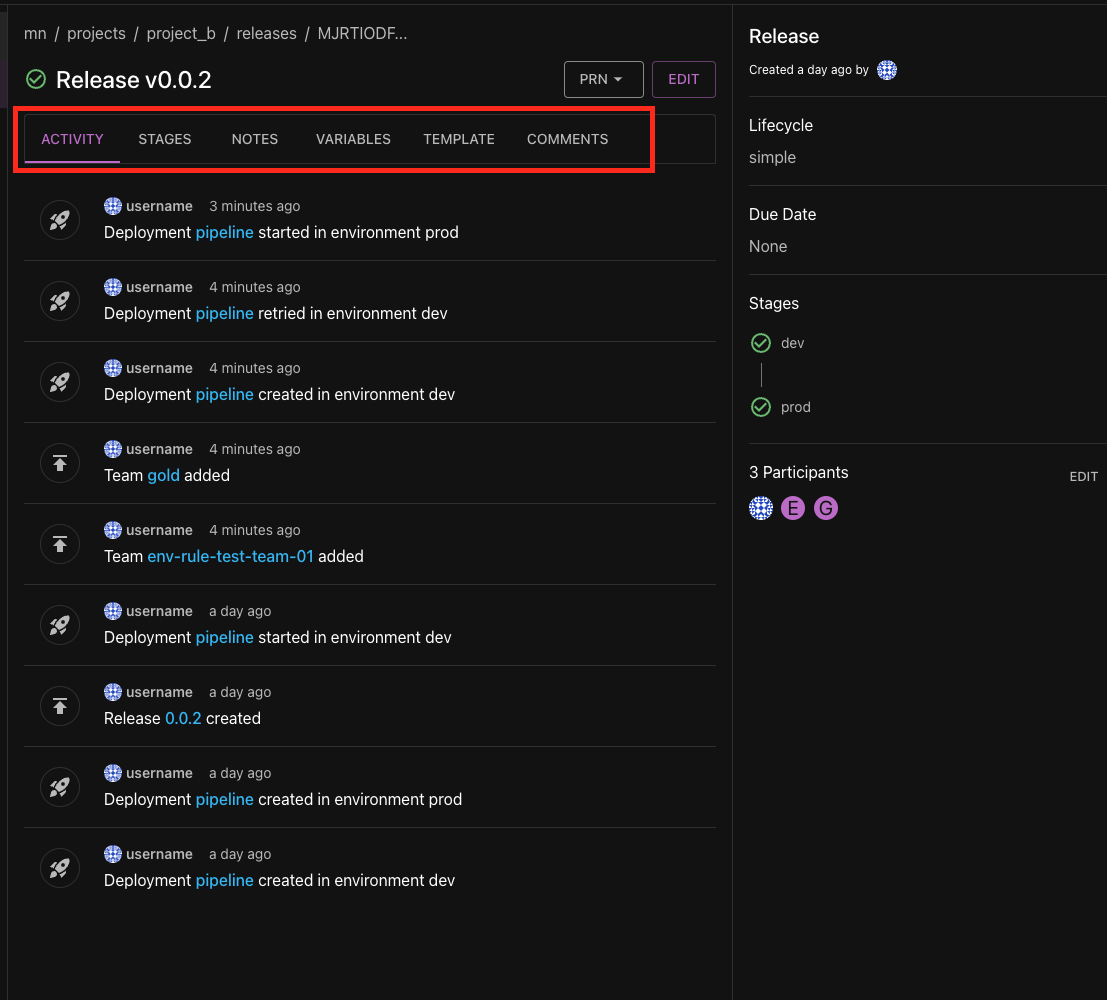
The release details page displays the following information:
- Activity: The release activity feed displays all the events and actions associated with the release, including the creation of the release, the status of its deployments, and any other updates made to it.
- Stages: Displays the stages of the release, which were generated from the selected release lifecycle. Select a stage item to view more details on the stage.
- Notes: Displays any notes that were added to the release.
- Variables: Displays the variables that were defined when the release was created. Variables are key/value pairs that are passed directly to any variables that have been defined in your selected pipeline templates.
- Template: Shows the release lifecycle pipeline template that was generated when the release was created.
- Comments: A feed of all the release comments. From here, members can start a conversation and add replies regarding the release. Comments also show up in the release activity feed and can be updated there as well.
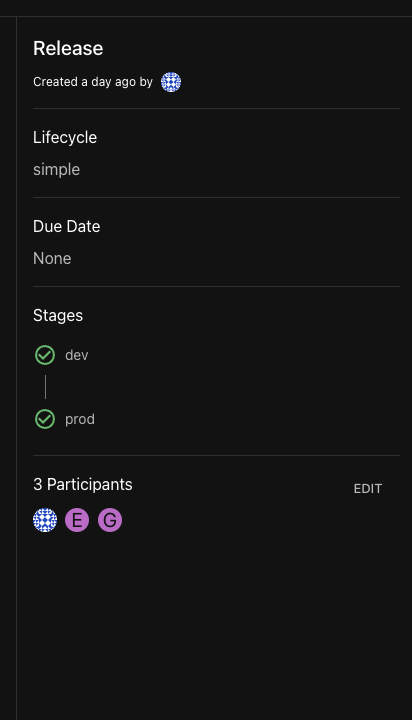
The release details page also has a sidebar that displays the following information:
- When the release was created and by whom.
- Lifecycle: The name of the release lifecycle that was used to create the release.
- Due Date: The due date of the release.
- Stages: A list of stages that was generated from the selected release lifecycle.
- Participants: A list of participants associated with the release. Participants can be added or removed from this section (see Edit participants).
Stages of a release
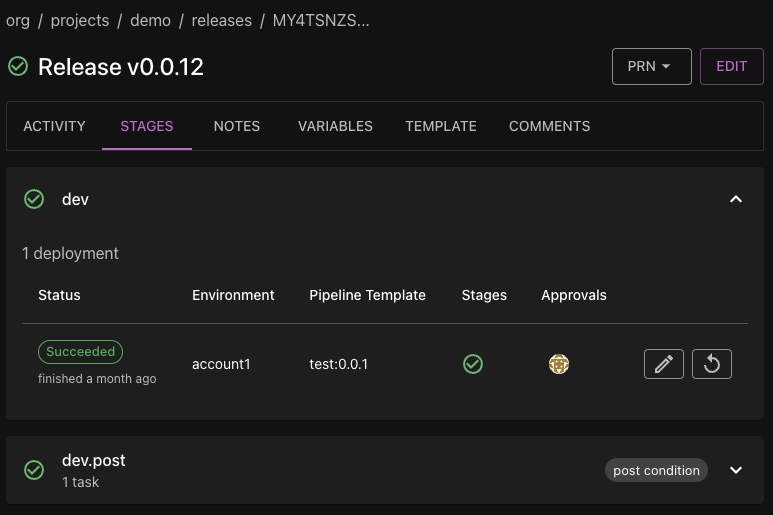
The stages of a release are generated from the selected release lifecycle. A stage may contain one or more deployments to an environment; in this case, you can run, retry, cancel, and even edit a deployment from this list item. A stage may also contain tasks that require manual intervention. Each deployment or task within a stage may have associated approval rules or conditions. This means that approvals are set on the specific deployment or task, not on the stage as a whole. Stages also display any conditions associated with the stage, including any approval rules in place or members who are required to approve the stage. A release is considered complete when all stages have been completed. See Release Lifecycles for more information.
Creating a release
Releases are typically created when your project is ready for deployment (whether production-ready or not). The following are the minimum resources necessary to create a release:
-
A release lifecycle created in the parent organization or within the target project. A valid release lifecycle defines at least one environment.
-
A pipeline template defined in the target project.
-
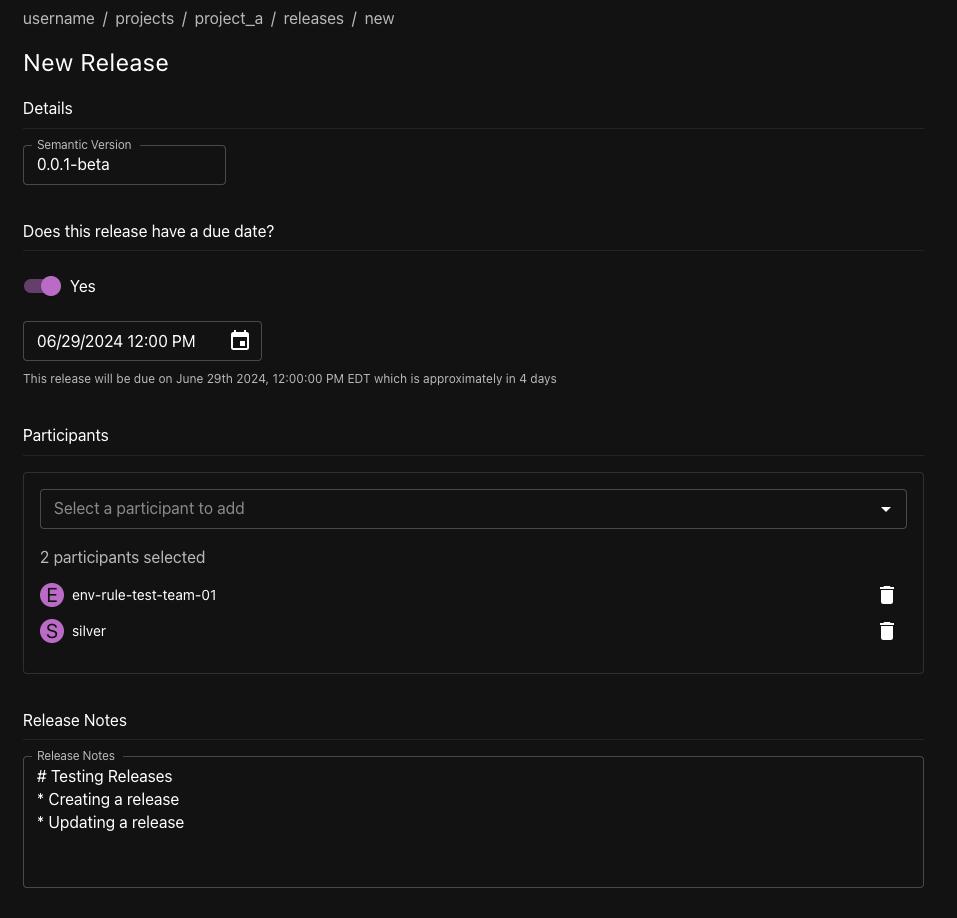
Go to Releases in the project sidebar. Then go to New Release.
-
Enter a semantic version for the release. Releases are required to have an identifier that adheres to the Semantic Versioning 2.0.0 specification.
- To denote a pre-release, add a hyphen and a pre-release identifier (e.g.,
1.0.0-alpha.1).
- To denote a pre-release, add a hyphen and a pre-release identifier (e.g.,
-
Optional. Enter a date in the future as a due date for the release.
-
Optional. Add participants to the release using the dropdown provided. The dropdown generates a list of users and teams that can be added.
-
Optional. Add notes for this release, which can describe the release or describe changes made since the last release. The notes feature supports select markdown features.
-
Select a release lifecycle from the Release Lifecycle dropdown. When a release lifecycle is selected, the form will generate a Deployments menu, which is a list of deployments for each environment defined in the selected release lifecycle.
-
Select a pipeline template for each deployment. Use the Pipeline Template dropdown to select an available pipeline template. After a pipeline template is selected, select a version of the pipeline template from the Version dropdown. By default, the latest version of the template will be selected, but you can select a different version.
-
Set Variables. You can create values to pass data directly to any variables that have been defined in your selected pipeline templates. You can add variables individually into your pipeline via the Release Variables table or you can use a project variable set from the Variable Set Revision dropdown menu.
infoAdding variables is optional and dependent on the specifications of your pipeline templates.
- Release Variables: select Add Variable to open the variables dialog to enter a new variable.
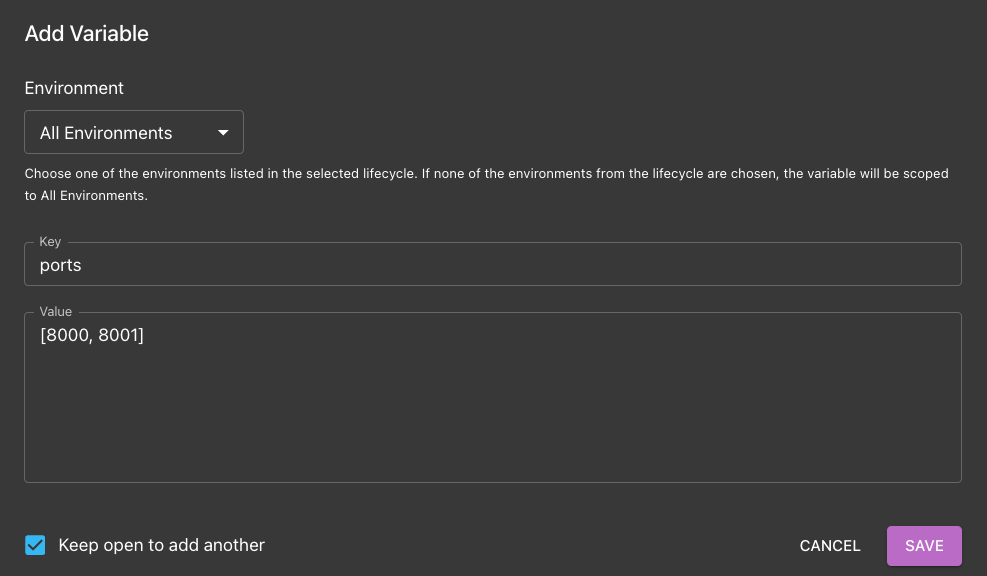
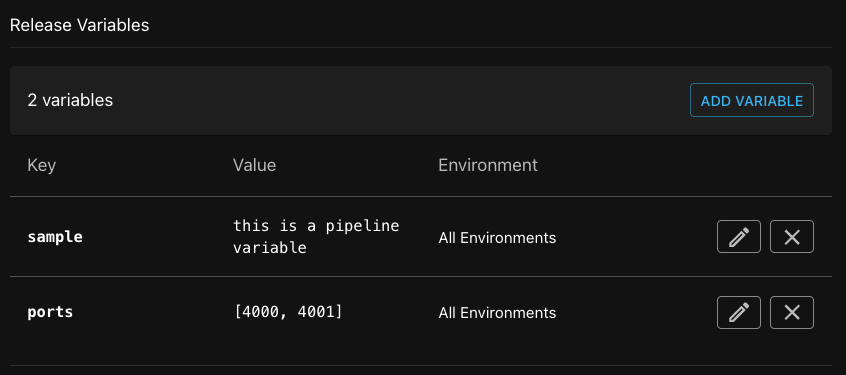
Adding variables will generate a list of variables on the release form. You can continue to add (Add Variable), edit, or delete (edit and delete icons) your list of variables before creating the release.
- Variable Set Revision: select a project variable set from Variable Set Revision dropdown menu. Select View Revision to open a new window that will show the project variables. See more on project variable sets.

-
When you are ready, select Create Release.
Updating a release
- Select the target release and from its details page, select Edit.
- Toggle the due date switch to either update or remove the due date.
- Update the release notes.
- When you are ready, select Update Release.
Edit participants
You can edit the release participants from the release details page.
- In the release details sidebar, select Participants > Edit.
- From the Edit Participants dialog, you can add or remove participants.
Adding or removing participants in the Edit Participants dialog will make immediate updates to the release participants list.
Managing release deployments
Release deployments can be managed by selecting the Stages tab from the release details page. Then select a deployment list item to expand the details of the deployment. From here, you have a number of options based on the status of the deployment.

Starting a release deployment
If the status of the deployment is Ready, select Start Deployment (arrow icon).
Scheduling a release deployment
- If the status of the deployment is Ready, select Schedule Deployment (clock icon).
- In the Create Schedule dialog, select a date and time in the future for the deployment to run.
- Select Set Schedule to confirm the schedule.
Updating a scheduled release deployment
- Select Update Deployment Schedule (clock icon).
- In the Update Deployment Schedule dialog, update the date and time of the deployment. To remove the schedule, click the Cancel Schedule check box.
Deferring a release deployment
- Select Defer Deployment (calendar right arrow icon).
- In the Defer Deployment dialog, provide a reason for deferring the deployment and click Defer to confirm the defer. Click Cancel to close the dialog without deferring the deployment.
Deferring a deployment allows you to bypass it while allowing the release to continue to the next stage. Deferred deployments are indicated as deferred in the release activity feed and can be restored at any time. A deployment can be deferred if it is in the Ready or Waiting status, meaning you can defer a deployment before it starts or while it is awaiting its scheduled time to run. Any dependents of the deferred deployment will be skipped, and the release will continue to the next stage.
Restoring a deferred release deployment
- Select Restore Deployment (trash can arrow icon).
- In the Restore Deployment dialog, click Restore to confirm the restore.
Restoring a deferred deployment reverts it to its original state, making it executable once its dependencies are met. Any dependents of the deployment will be restored as well.
Updating a release deployment
- Select Edit Deployment (pencil icon).
- From the Edit Release Deployment page, you can update the pipeline template and version. Additionally, you can add, update, or remove variables for the deployment.
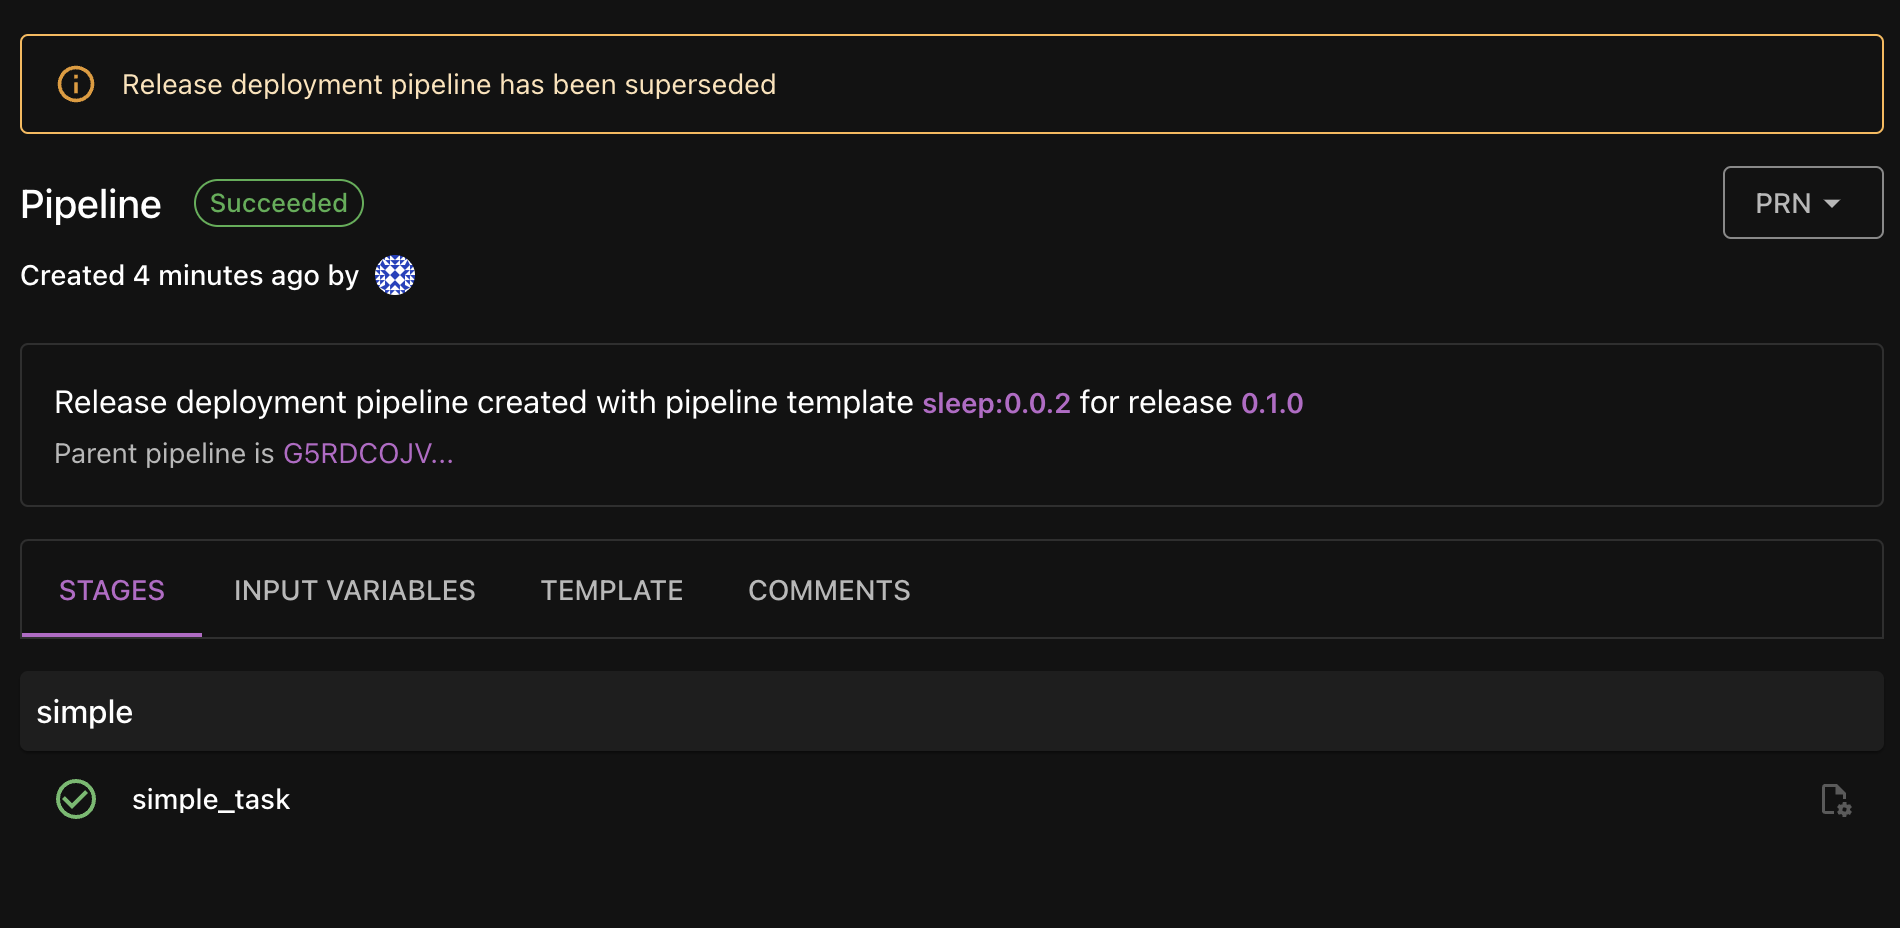
After a release deployment is executed, the inputs to the pipeline and the pipeline automation itself will be immutable for the lifetime of the release. This guarantees that release deployments will be reproducible and capable of rolling back to a previous version. If a release deployment is updated after a pipeline has successfully completed deploying a release to a particular environment, the state of the release lifecycle will be updated to reflect that the stage associated with the updated pipeline needs to be deployed again.
In the example below, this pipeline was generated by a release deployment that successfully completed. Then the release deployment was updated (the pipeline template and version were updated). The notification banner informs the user that the pipeline has been superseded and the stage associated with the updated pipeline will need to be executed again.
Retrying a release deployment
- Select Retry Deployment (replay icon).
- In the Retry Deployment dialog, click Yes to confirm the retry.
Canceling a release deployment
- Select Cancel Deployment (x icon).
- In the Cancel Deployment dialog, click Yes to confirm the cancel.
Canceling a release
- If a release has not completed all stages, you can cancel the release. Canceling a release will cancel the current release lifecycle pipeline.
- Select the target release and from its details page, select the drop-down icon next to Edit.
- Select Cancel Release.
- In the Cancel Release dialog, click Cancel to confirm the cancel.
Canceling a release stops the current release lifecycle pipeline. The release will remain in Phobos and can be restarted at any time.
Deleting a release
- Select the target release and from its details page, select the drop-down icon next to Edit.
- Select Delete Release.
- In the Delete Release dialog, click Delete to confirm the delete.
Deleting a release is an irreversible operation.
Proceed with extreme caution as deletion permanently removes ALL data generated by the release, including pipelines, notes, and comments. If unsure, do not proceed.
Frequently Asked Questions (FAQ)
Who can create, update, and delete releases?
Project members and memberships inherited from the parent organization with the roles of Owner, Release Manager, or Developer can create, update, and delete releases. Members with the role Viewer can view releases but cannot create, update, or delete them.
What is a pre-release?
Pre-releases are releases that are not yet production-ready. Pre-releases are flagged with a chip next to the semantic version of the release. Designating a release as a pre-release is optional.
What's the difference between a release and a release deployment?
A release is a project-level resource that consists of stages that must be completed in order to consider the release complete. A release deployment is a resource that may be contained within a stage of a release and is generated when the release is created.
Why don't I see the option to start/retry/cancel my release deployment?
The options to start, retry, or cancel a release deployment are dependent on its status. Stages of a release must be completed in order, so a release deployment may not be started, retried, or canceled until the previous release deployment has completed.
What can release participants do?
Release participants will be notified of any updates to the release, including the creation of the release, the status of its deployments, and any other updates made to it. At the moment, notifications have not been implemented, but we plan to add this feature in the future.
I've filled out the release form, but I can't create the release. What's wrong?
The UI will generate an error message if there are any issues with the form and should point you in the right direction. Additionally, here are some items to check:
-
Variables: Check your selected pipeline templates to see if any variables are required. Check that they have been properly assigned on the release form. Adding a variable and selecting All Environments will assign the variable to all environments in the pipeline template, which may cause an issue if one of the environments does not require the variable.
-
Release lifecycle: Check that the release lifecycle you selected has at least one environment defined. If the release lifecycle does not have any environments, you will not be able to create a release.
-
Pipeline templates: Check that the pipeline templates you selected are valid and have the correct versions. If the pipeline template is not valid or the version is incorrect, you will not be able to create a release.